Give each paycheck its own due-date window, set-asides, flexible spending limit, and buffer so monthly totals match the timing of real bills.
A monthly budget can say that your income covers your expenses and still leave you worried before payday. The problem is often timing. Rent may be due near the first of the month, insurance near the middle, and groceries every week. Your monthly total looks fine, but the wrong paycheck is carrying too many jobs.
A biweekly budget solves that timing problem by giving each paycheck its own plan. Instead of asking, “Can I afford this month?” you ask a more useful question: What must this paycheck cover before the next one arrives?
This guide focuses on the worksheet itself. You will build two clear paycheck columns, assign bills by due-date window, reserve money for large upcoming expenses, and calculate what is actually available until the next deposit.
For a simple biweekly budget, make one column for each of the two paychecks in a normal month. Under each paycheck, list the deposit amount, bills due before the next payday, savings transfers, sinking-fund contributions, flexible spending, and money carried forward for a large bill. Subtract every assignment from that paycheck. The remainder is your buffer—not unassigned spending money.
Biweekly and twice-monthly pay are not identical
People often use “biweekly” to mean any schedule with two paychecks in a month, but there is an important difference.
- Biweekly pay arrives every 14 days. That creates 26 paychecks in most years: ten months with two paychecks and two months with three.
- Twice-monthly pay usually arrives on two fixed dates, such as the 1st and 15th. That creates 24 paychecks per year.
The two-column method below works for both. If you are paid every two weeks, you will also need a rule for the two extra-paycheck months. We will handle that near the end.
What this worksheet does that a monthly budget misses
A standard monthly budget groups all income and expenses into one total. That is useful for seeing the big picture. It is less useful when you need to know whether the first paycheck can carry rent, utilities, food, and a debt payment before the second paycheck appears.
The Consumer Financial Protection Bureau recommends a bill calendar because due dates matter, not just monthly totals. Consumer.gov also suggests gathering bills and pay stubs, recording income and expenses, and subtracting expenses from income. A two-paycheck worksheet combines those ideas: it uses the monthly plan, but adds the timing of each deposit and bill.
If you first need the broad method and the reasoning behind assigning bills to paydays, read How to Budget by Paycheck Without Feeling Behind. The worksheet below is the next step: turning that method into a repeatable table.
Build one table with two paycheck columns
Create a page in a spreadsheet, a notes app, or a paper planner. Use one row for each type of assignment and one column for each paycheck.
| Assignment | Paycheck 1 | Paycheck 2 |
|---|---|---|
| Pay date | ||
| Take-home pay | ||
| Bills due before next paycheck | ||
| Set-aside for a future large bill | ||
| Savings transfer | ||
| Sinking funds | ||
| Groceries and household spending | ||
| Transportation | ||
| Other flexible spending | ||
| Buffer | ||
| Amount left |
Do not start by filling every category you have ever used. Start with the categories that answer one question: Where must this paycheck go before the next deposit? You can add detail later if it helps you make decisions.
Step 1: Enter the real deposit dates and take-home amounts
Use the amount that actually reaches your account after taxes, insurance, retirement contributions, and other payroll deductions. If the amount changes, use a conservative estimate and update the worksheet when the deposit arrives.
Write the next two pay dates at the top. These dates create two spending windows:
- Paycheck 1 covers the period from its deposit date until the day before Paycheck 2.
- Paycheck 2 covers the period from its deposit date until the day before the following Paycheck 1.
This boundary prevents the common mistake of spending from both paychecks mentally before the second one exists.
Step 2: Map bills to the paycheck that comes before their due date
List each fixed bill with its due date. Then place it under the paycheck that will fund it.
If Paycheck 1 arrives on October 2 and Paycheck 2 arrives on October 16, a bill due October 10 belongs under Paycheck 1. A bill due October 22 belongs under Paycheck 2.
Do this even when a bill is on autopay. Autopay changes how the payment leaves your account; it does not change which paycheck needs to fund it.
If one paycheck becomes overloaded, you have three options:
- reserve part of the previous paycheck for that bill;
- ask the provider whether the due date can be changed;
- split the amount across both paycheck columns.
The last option is especially useful for rent, a mortgage, childcare, or another large monthly obligation.
Step 3: Split large bills before they become emergencies
Suppose rent is $1,800 and is due on the first. If the second paycheck of the current month is the last deposit before next month’s rent, do not wait until the next calendar month to think about it.
Set aside $900 from Paycheck 1 and $900 from Paycheck 2. The money is assigned as soon as it arrives, even if the payment itself will happen later.
This row is called carry-forward or set-aside for a future large bill. It is not extra money. It belongs to a known future expense.
You can use the same method for quarterly insurance, annual subscriptions, holiday travel, car registration, or school costs. For irregular expenses, divide the expected amount by the number of paychecks before the due date.
Step 4: Add savings and sinking funds as paycheck assignments
Savings works better when it has a place in the worksheet instead of depending on whatever remains at the end of the month.
Use separate rows for:
- emergency savings;
- a short-term goal;
- sinking funds for predictable non-monthly costs;
- retirement or investing that is not already deducted from payroll.
If a monthly savings target is $300, you might assign $150 to each paycheck. If one paycheck is heavier, use $100 and $200 instead. Equal splits are convenient, but the real goal is a plan that the cash flow can support.
Step 5: Give flexible spending a limit for each pay period
Groceries, fuel, household supplies, and personal spending do not always have fixed due dates, but they still need a limit.
Estimate what you need between the two paydays, not what you normally spend in a full month. For example:
- groceries and household: $260;
- transportation: $100;
- personal or miscellaneous: $80.
That creates a $440 flexible-spending allowance for the pay period. You can keep the categories separate or combine them if a single number is easier to maintain.
The number should be realistic enough to follow. A limit that ignores medicine, commuting, children’s needs, or the actual cost of food will not make the budget more disciplined; it will only make the worksheet inaccurate.
Step 6: Calculate the available amount and keep a buffer
For each paycheck, use this formula:
Take-home pay − bills − carry-forward − savings − sinking funds − flexible spending = amount left
If the result is negative, adjust the plan before spending begins. Move a flexible expense, reduce a nonessential category, split a large bill differently, or use money that was already reserved for this purpose.
If the result is positive, label part or all of it as a buffer. A buffer protects the plan from a higher utility bill, a prescription, an extra tank of gas, or a grocery week that costs more than expected. It is not a challenge to spend the remaining balance.
A complete two-paycheck example
Imagine a household receives two take-home paychecks of $2,100, for total monthly income of $4,200.
Paycheck 1
| Assignment | Amount |
|---|---|
| Take-home pay | $2,100 |
| Rent set-aside | $900 |
| Utilities | $180 |
| Insurance | $120 |
| Groceries and transportation | $360 |
| Sinking funds | $100 |
| Savings | $150 |
| Buffer | $290 |
The assignments before the buffer total $1,810. Subtracting them from $2,100 leaves $290.
Paycheck 2
| Assignment | Amount |
|---|---|
| Take-home pay | $2,100 |
| Remaining rent set-aside | $900 |
| Phone and internet | $160 |
| Debt payment | $250 |
| Groceries and transportation | $360 |
| Sinking funds | $100 |
| Savings | $150 |
| Buffer | $180 |
The assignments before the buffer total $1,920. Subtracting them from $2,100 leaves $180.
Across the month, the household assigns $3,730 and keeps $470 in combined buffers. Both paychecks have a complete job, and the next rent payment is already being funded.
The exact amounts are only an example. The useful part is the structure: every bill and transfer belongs to a specific deposit.
Add planned and actual columns when the basics work
Once the two-paycheck plan feels manageable, add an Actual column beside each planned amount.
At the end of the pay period:
- enter what actually cleared;
- compare it with the planned number;
- move any true remainder to the next priority;
- adjust the next pay period using what you learned.
A difference is information, not a failure. If groceries exceed the plan for three pay periods, the estimate may be too low. If a category is consistently under budget, you may be able to redirect part of it to savings or debt.
Keep the review short. Ten to fifteen minutes on payday is enough to confirm deposits, due dates, transfers, and the amount available until the next check.
What to do in a three-paycheck month
If you are paid every two weeks, two months in many years will contain a third paycheck. Do not build essential monthly bills around that extra check, because it does not appear every month.
Before it arrives, choose an order for the money:
- fund expenses that must last until the next normal payday;
- cover any bill that falls in the new due-date window;
- rebuild a depleted buffer or emergency fund;
- add to a sinking fund or upcoming annual expense;
- make an extra debt payment or move money toward a priority goal.
The third paycheck is not entirely “bonus” money—the days it must cover are real. But after those obligations are assigned, it can accelerate a goal without making the normal two-paycheck plan depend on it.
How to adapt the worksheet for irregular income
If your pay varies, keep the same two-column structure and change the starting number.
Use a conservative baseline based on recent lower-income periods. Assign essentials first: housing, utilities, food, transportation, insurance, and required debt payments. Add savings and flexible categories after those needs are covered.
When income is higher than the baseline, direct the difference in a preselected order—for example, buffer first, then next month’s rent, then a sinking fund. A predetermined order reduces the temptation to treat every strong paycheck as permanently higher income.
A spreadsheet option for this method
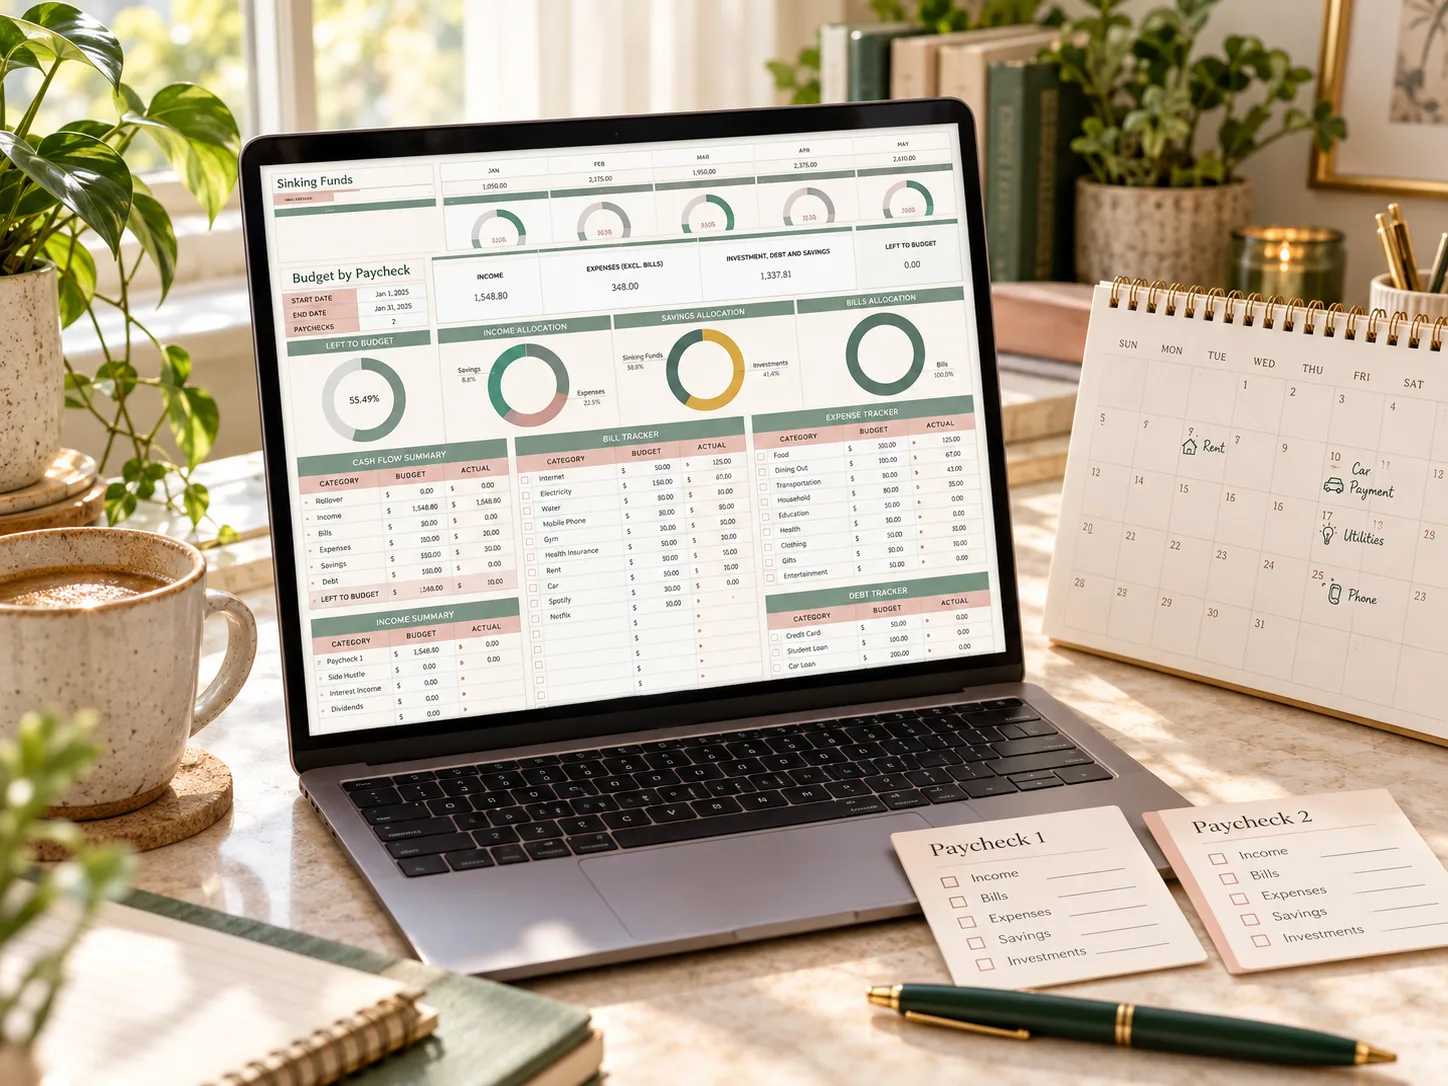
If you prefer a ready-made worksheet, the Premium Personal Finance Planners bundle includes a paycheck budget spreadsheet alongside monthly budget and sinking-fund planners. The public listing says the bundle contains sample and blank files for both Google Sheets and Microsoft Excel and is intended for weekly, biweekly, and irregular pay schedules.
That combination is relevant because the three views serve different jobs:
- the monthly planner shows the full month;
- the paycheck sheet handles timing between deposits;
- the sinking-fund tracker holds predictable future expenses outside the normal monthly cycle.
The public previews show the worksheet layout, but I have not purchased or downloaded the files. Formula behavior, protected cells, and the exact downloaded contents were not independently tested. Review the listing details and previews before deciding whether the format fits your routine.
 Two-paycheck worksheet
Premium Personal Finance Planners
A spreadsheet bundle with paycheck, monthly budget, and sinking-fund layouts supplied in sample and blank versions for Google Sheets and Excel.
See the planner and included files →Disclosure: If you purchase through the product links above, Calm Budgets may earn a commission at no additional cost to you.
Your first 15-minute setup
You do not need a perfect category system to begin. Set a timer and do only this:
- write the next two pay dates and expected take-home amounts;
- list every bill due before the third payday;
- place each bill under the paycheck that comes before it;
- split any large bill that would overload one check;
- add realistic food and transportation limits;
- add one savings or sinking-fund transfer;
- calculate the remaining buffer for each paycheck.
Save the worksheet and reopen it on the next payday. The system becomes useful through repetition, not through adding more categories.
The goal is clarity between paydays
A biweekly budget is not a more complicated monthly budget. It is a timing map.
When each paycheck has a clear job, you can see which money is available now, which money belongs to a bill, and which money must wait for the next month. That clarity is what prevents a healthy monthly total from turning into a stressful week before payday.
Start with two columns. Assign the next set of bills. Keep a buffer. Then let the next paycheck tell you what needs to change.
Sources and further reading
Written by Calm Budgets